Welcome to the second edition of Pimp My Pic!

I’ve had such a cruddy holiday week off with my blood pressure being elevated, the kidlet being a major pill, and my dear husband practicing throat clearing and snorting as if he were preparing to compete in these events during the next Olympics. Even though I did receive my coveted 105 2.8 Nikon micro lens and a battery pack for the Precious, I’ve felt so awful that I haven’t done much in the photography realm. I had such big plans to get the 2012 kidlet and client calendars done, as well as finishing a product guide for EJP. Sigh… It did not happen.

But today on Facebook, I saw an image so adorable that I just had to broach my friend Tara about Pimping Her Pic! She had a fantastic shot of her daughter, Kaia, that needed a little pimping to bring out its full glory. So after I put The Pill to bed, I got to work.

Here is the original image of this adorable cutie pie:

Step 1: Importing into Photoshop

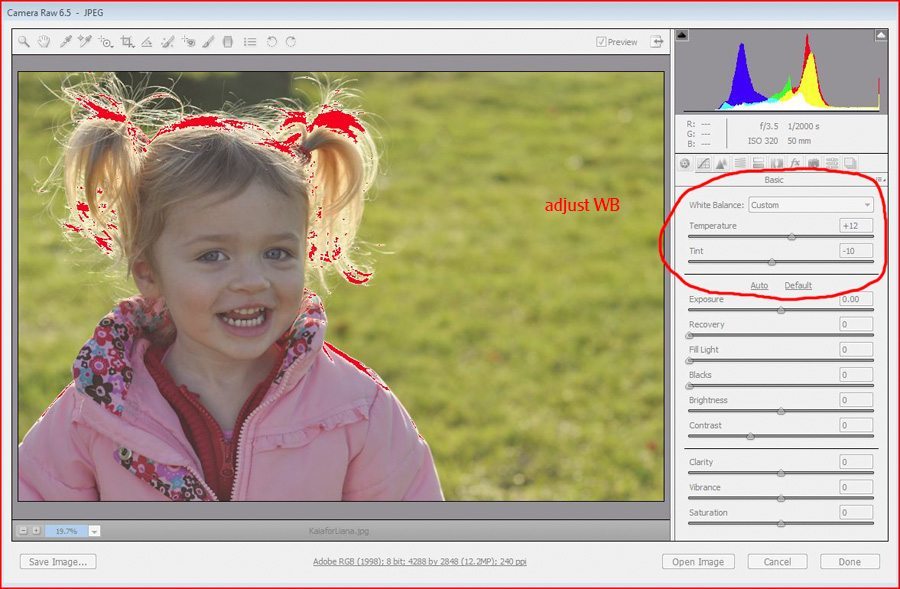
The first thing I did was to import the photo into PS. Initially this brings up the Adobe Camera Raw (ACR) dialogue box. ACR allows you to make adjustments before the file is even opened in Photoshop proper.

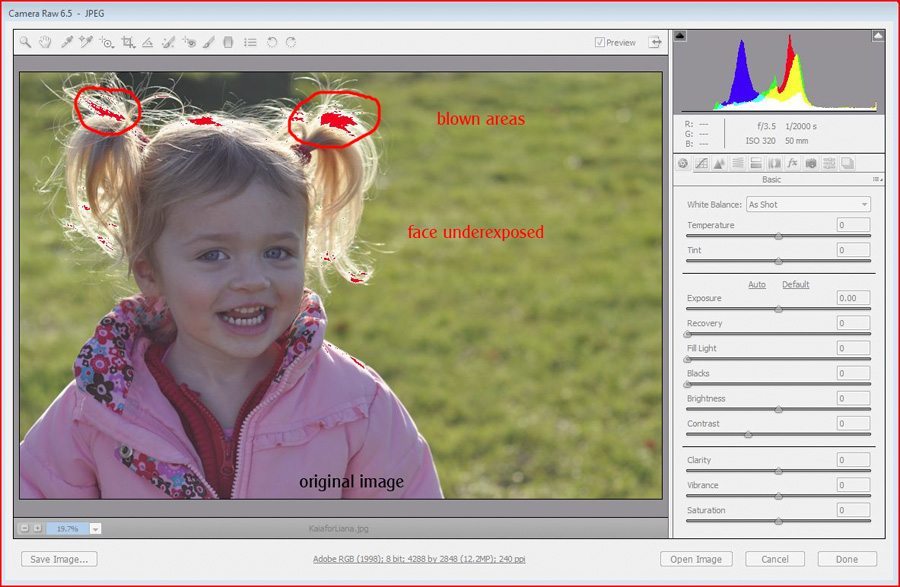
What we notice here is that Kaia’s face is underexposed while there are blown (overexposed) areas in her hair where the sun hit (red highlights). Were I to venture a guess about why her face came out underexposed, I would say that the most common culprit is matrix metering. When you use matrix metering, the camera balances the exposure choice over the entire frame rather than knowing that you’d prefer HER to be adjusted for. And in a back/side lit situation like this, the camera usually gets it wrong. Using spot metering and metering on the skin of the subject is a way to get the subject’s exposure right in camera, though it will still take some manual adjustments in many cases.

Step 2: Adjust White Balance


Adjusting white balance in this photo was very tricky because there were few neutral color items that I could click on with the WB dropper tool to adjust the white balance. You look for neutral gray, or you can use white in a pinch. I ended up using the whites of her eyes, but still didn’t feel certain that I got the color correct. I knew I would have to do more skin correction later in PS.

Step 3: Adjust exposure


My goal here was to adjust the exposure for her skin tones and not worry about the background or the blown areas in her hair. As you can see above, I ended up increasing the exposure by a full stop (and I still wasn’t sure she was bright enough).

Step 4: Recovery


I used the recovery slider to get back as much of the blown areas in her hair as I could. I also added a little black for definition. I then opened the photo in Photoshop.

Of course when you fix underexposure so dramatically, you end up with a lot of noise in the image. I discussed this in the last PMP. So to fix this, I ran Noiseware at a low setting to reduce the grain that now appeared when you viewed the photo at 100%.

Step 5: Levels Adjustment


After running Noiseware, the first thing I did was to adjust the levels using a levels adjustment layer. If you look at the histogram above, you see that there was almost nothing on the far left (blacks/shadows), so I moved the black slider to where the histogram data started on the left (indicated by the blue arrow). This then made Kaia a little too dark, so I adjusted the midtone (middle) slider toward the darks (indicated with the red arrow), thus giving more room to the light side of the histogram (the right). We were looking better already!

Step 6: Brighten/lighten with Curves


I still felt that her face was not bright enough. So I added a curves adjustment layer and selected a point on her forehead to be the reference point for brightening. I pulled up the point slightly, but didn’t like what this did to the grass. So I ended up inverting the mask (making it black) and using a soft white brush to paint in the brighter area on her skin.

Step 7: Skin Color Correction

I’ll be the first to admit that skin color correction drives me mad. But if we look at the CYMK numbers from the spot on her forehead above, you will see that her cyan is 31%, magenta is 34% and yellow is 41%. That is not an ideal ratio. Yellow should be highest, and magenta less than yellow, but the cyan should be 1/4 to 1/3 of yellow’s value. As you can see we were way off.

I added a color balance layer and added more red to the midtones and highlights to get the cyan down. But I would have had to truly dial up the red in order to get the cyan down to 1/3 of the yellow. This led to a judgment call. I opted to settle for cyan being 1/2 of yellow rather than making Kaia the incredibly red girl.

We ended up with a cyan of 16%, magenta of 28% and yellow of 31%. And now she looks more alive! But the skin color correction did something very odd to the grass, so I masked that back with a black brush.

Step 8: Color Pop

One of the most fun tools you can use to give your image a little pop is to duplicate the background layer (or just use an unadjusted curves or levels layer) and set the blend mode to overlay, soft light or hard light. Overlay adds contrast, darkens your darks and lightens your lights. Soft light is a softer adjustment than overlay.

Above I wanted to show you where we started after color correction, and then after adding an overlay blend mode layer. As you can see, the overlay layer at 100% opacity is too, too, much! She looks neon colored. But when we pull the opacity down to 45% we get something more reasonable. So don’t let the 100% image scare you. You can adjust for as much or as little pop as you would like.

I find, however, that when editing young kids, I prefer the soft light blend mode to the overlay blend mode.

Above I added a curves layer and set it to soft light blend mode. I left the opacity pretty high at 80% because soft light isn’t as dramatic as overlay can be. I also used a technique to get rid of the yellow patches in the shadows (neck, chin). And now we are looking pretty darn good!

Step 9: Pay No Attention To The Man Behind The Curtain!

The last bit of editing is slightly more advanced, but it took us a little beyond where we landed after the color pop. I brightened and sharpened her eyes a teensy bit and then also got rid of that dark blob above her head that was distracting. I removed a couple of facial ditzels and then sharpened for web. Sharpening always improves how your image appears on the web. It adds a hint of crispness.

Eh voila:

Pretty glorious, right? It even made a lovely black and white image too:

There you have it. Kaia’s picture is all pimped out!

This may all be a lot to take in, but feel free to pepper me with questions about anything I did in editing this image. And if you are interested in submitting your photo for Pimp My Pic, just send me an e-mail!

  • Sheila - Wow, Liana – that is fantastic! It was a lovely shot to begin with, but you have really made it come alive. Well done – and hope you feel better soon πŸ™‚ReplyCancel

  • Tara - Wow!!!! I love it!!!! I’ll have to pay more attention at some point to the tutorial, but for now I just love the finished product of my baby! πŸ™‚ You are so very talented. πŸ™‚ Thank you!ReplyCancel

  • Krista Cozart Gipson on Facebook - Oh wow! That is impressive indeed. πŸ™‚ReplyCancel

  • Julie - Stunning!!!!ReplyCancel

  • Michele - Beautiful! Both the subject and retouched photo are adorable!!!ReplyCancel

  • Barb - Beautiful subject and beautiful work! πŸ™‚ReplyCancel

  • Sarah Bunch - Awesome job!! I love this idea!ReplyCancel

  • Renee nelson - Amazing work! I am a beginner photographer and just purchased PS. It is overwhelming to learn but this helped a ton. Can you tell me how you sharpen in PS? Also, I would love you to pimp one of my photos. I am not sure how to send it to you. I dont see an email. Thanks so much for sharing πŸ™‚ReplyCancel

    • Liana - Hi Renee!

      Welcome to the EJP blog and I’m so glad you found this little tutorial to be useful!

      When I sharpen in PS, I cheat and use two great free actions from Jodi of MCP Actions called High Definition Sharpening (good for print) & Crystal Clear Web Resize and Sharpen (when posting to the web). You can find them here. But when I have done it manually, I duplicate the background layer, change the blend mode of this duplicate layer to overlay, and then use the high-pass filter. It is the same method as described here: Sharpening with High Pass filter.

      I’d love to Pimp your Pic during my next go-round. Feel free to e-mail me at liana (at) eclecticjourneyphotography.comReplyCancel

  • Regina Marie - Ok, that’ pretty fabulous! No, I take that back… it’s REALLY fabulous! The before and after are like night and day! Thank you for sharing this. I might need to “borrow” ome of my friends pictures to try this out.ReplyCancel

  • Joy W - As adorable as your subject is, and as nice of a job you did on improving this photo, I cringe hearing the word “pimp” used lightly or casually. I understand that it IS used in shows like “Pimp My Ride” (and maybe others), but with what we of modern sex slavery and the disgusting tactics used by pimps to ensnare, keep and sell women and children (link removed) is one place to start to learn about the awful things pimps do, another is (link removed) and honestly, both of those are a bit tame in their descriptions), I really think we should not make light of those people or the word.

    An alternative doesn’t immediately come to mind (I prefer not to be a person who criticizes but doesn’t suggest a solution), but almost anything would be better than “Pimp My Photo”.ReplyCancel

    • Joy W - Oops, “Pimp My Pic”, I meanReplyCancel

    • Liana - Joy,

      Thank you for your feedback. I find it to be a bit unexpected and reductionist in your assessment of word meaning and intent, however.

      I am concerned with some assumptions you seem to have made in your comment. First, you seem to assume that I know nothing of sex trafficking and need you to enlighten me. I’m afraid that I need no such enlightenment. I know quite a bit about this horror without needing to view the links you have provided. Second, you have decided that “pimp my pic” seeks to make light of sexual slavery. Again, that is absolutely inaccurate.

      I am sorry that the word “pimp” makes you cringe. It does not have the same effect on me.

      According to the definition of the word proffered by Google, the second and informal definition of the word is the following:

      “make (something) more showy or impressive.”

      It is this definition that I am using in my photo series and I am comfortable with it for my purposes.

      Thank you again for your feedback.ReplyCancel

share on facebook|follow me on twitter|pin it|email post to a friend

Hi Friends,

So here’s the question for the day: how many photos does it take to get the ideal Clark-Schecter holiday card picture? Now before you answer remember that this involves my being in front of the camera and not behind it. That added a degree of difficulty of about 200%.

What do you think?

If you chose any option other than the last choice, well, you must be one of those optimists!

Our first foray was on December 4th. I was going for a sun-going-down, golden hour look. It was unseasonably warm and the kid was cooperating. Honestly after that shoot, I thought I had nailed it then and there. Got some great shots. Rocked the backlighting. Of course when we had started, I had forgotten to tell Mason to take off his damn Transitions glasses! Those things have plagued me for years. I’ve spent way too long in previous years attempting to restoreΒ visibleΒ eyes behind those sun-darkened lenses.

But that notwithstanding, I was able to find some goodies. I then posted the ones I was considering for the card on Clickin Moms to get some feedback.

So I’m thinking to myself, these both look pretty good, if I do say so myself. Though I prefer the second one to the first because of Zara’s expression, I think the softness in our features from the backlighting might make it the weaker choice.

And then the feedback started to come in.

“Gorgeous shot, but that tree is too distracting,” one commenter said. From another: “I agree with the previous poster. Wish you had positioned yourselves differently.”

And I’m thinking to myself, OMG, there is a tree growing out of our heads. Am I mental? How did I not see that?!

The truth is that I had seen the tree but ended up at a loss about how to position us in relation to that tree. Somehow I thought that if there were three of us, it wouldn’t look as if the tree were growing out of all of our heads. But there is it, up close and personal. The tree IS growing out of our heads!

Other commenters attempted to assure me that those I would send the card to would not be nearly as distracted by the tree as we photogs are. Of course, by that point, I could see nothing in the photo BUT the tree! I decided to reshoot.

Unfortunately Saturday the 10th was nothing like Sunday the 4th. It was about 20 degrees colder and the ground was wet and mucky. The kid was cold and uncooperative and the hubby was surly because she was cold and he felt that I hadn’t dressed her warmly enough. I ended up rushing the shoot despite doing all I could to keep her in the warm car between set-ups. I then made the mistake of asking her to smile showing her teeth. She’d never had any problem with that in the past, but after getting back to my computer and uploading the images, I found that my kid must have decided that she was a beaver! I saw some of the most silly faces she has ever made.

I was so sad that night. What kind of photographer did I hope to be if I couldn’t even get a photo of my own family?! So my dear, supportive husband made me get right back in the saddle. The next day, he insisted in going out and doing it all over again. He’d dress Z in more layers and he would stop breathing down my neck in order to allow me to relax and do my thing. Of course Z ended up in one of her oppositional defiant modes again, but a total of 417 shots later, we had some good photos that didn’t have trees growing out of our heads!

Here are some of the outtakes:


Note the wonderful Transition lenses in these:

Yes, this still has the tree, but I love this shot!

So which photos made it to the card?

Front:

Inside top:

Inside bottom, flanking holiday message:

Back Panel:

Not so bad, despite all that work, right? I’m going to use these to make a canvas wall photo collection for the house.

But I do have to show you guys the beauty of digital editing, though. Now you all know that I’m massively huge these days thanks for my steroids. Even though I’m in a feel good about myself because fat is better than dead place, I still shuddered a bit at how round both Mason and I looked in these images. I opted to use a can-be-used-for-good-or-for-evil editing tool called liquify. Using this PS tool, I managed to give us a bit of a digital diet in some of the photos:

Before is on top and after below. We lost a good 20 pounds with the use of technology! Mason wanted me to go even further, but no. These tools cannot be used to suspend all connection with reality!

So there you have it, my friends. The fun of a family photo shoot when you are both photog and subject!

Hope your holiday was wonderful! Best to you in the new year!

  • Eclectic Journey Photography on Facebook - No comments from any of my peeps? Too much holiday celebrating? πŸ™‚ReplyCancel

  • lorrie - I think you did great and compliments to
    Kidlet for sitting through them!!! My 13 year old is as fun and easy to photograph as a ghost. But i remember how ugly i thought i was at that age and how i hated the camera too….ReplyCancel

    • Liana - Teens can be very tough, I know. Sometimes they are more willing to loosen up when you show them how you can edit them a teensy bit. Though I always do minimal editing on young people. Not trying to create the fashion magazine faux perfection.ReplyCancel

  • Sheila - Lovely photos, Liana – beautiful light and colours. My favourite shot of all is your first outtake – with the tree on the left πŸ™‚ I also like the fourth outtake where you have your hands in the air – you all look so happy!ReplyCancel

    • Liana - Thanks, Sheila! Ah you picked the toss up photo we were considering for the front of the card. Mason wanted the first outtake and I wanted the one that was chosen, but both were good, I thought. I loved shooting in that golden hour backlight!ReplyCancel

  • Kellie - Wish I had half your skill with the camera! Great pictures, Liana. Even those with the tree growing out of your head! (Honestly I was more distracted by the stuff in the upper left corner in those pictures)ReplyCancel

    • Liana - Oh those yurts (or whatever the heck they were) would have been gone, gone, gone through the magic of photoshop had one of those been chosen. I think they actually were behind Z in the photo of her hanging from the tree branch but I got rid of them.

      I think that shooting your own family is horrifically hard. Shooting the kid is easy. Even shooting Mason is easy. But getting us all in frame using the remote release. OMG hard!

      Thanks!ReplyCancel

share on facebook|follow me on twitter|pin it|email post to a friend

Saturday morning was a treat. I headed out to do a family mini-shoot on a beautiful blue-sky morning.

Upon arriving, I was greeted by Kristine, Jason and my new buddy, William, who also became known during the shoot as The Little Running Man (or Running Guy, if you prefer!). You will soon see why he got that moniker.

But first, I’ve got to tell you how much fun it was to work with such a great family. I was a little sorry that it was a mini-shoot as I could have filled several CF cards with photos of this comely trio. And two-year-old William was so excited to head outside and take pictures with Mommy & Daddy. Sometimes the munchkins are shy or reserved. Not my Little Running Man. Such an adorable cutie pie!

We started with some relaxed shots on the deck to get started.

It soon became clear that William thought the best way for me to capture his essence was for him to run, run, run, and dare both me and The Precious (my camera) to keep up. Clearly he didn’t know how ancient I am, despite being the mom of a 4-year-old! But hey, I gave it my best.

We coaxed him back into position by giving him a special spot on the deck  just for him. I got this one before he was off and running again:

It was so cute!

When we moved to the side of the shed for the next set-up, William decided it was truly on like Teflon! He became the Little Running Man in earnest.


Just too much!  πŸ˜€

Mommy & Daddy were able to corral him for a few nanoseconds for a very sweet shot:

Then we moved out front to our last location, where he ended up getting a lift from Mommy & Daddy:

(I totally love this shot and would kill for someone to take our family picture and have us look as effortlessly gorgeous as this family does. Though this would involve a generous application of Photoshop’s editing, de-aging, de-rotunding properties in our case! πŸ˜† )

But they let him down and he was able to get his run on again:

A-ha, Mommy & Daddy, I have escaped your clutches and am now free to run again!

I did manage to get him to sit still for some amazing portraits. Oh the hair! The eyes! Watch out Jason & Kristine. He causes instant meltage of the heart.

Is there a better way to spend a Saturday morning than with a little running man and his family? I just don’t think so.

  • kristine - I just read this and looked at the images again with a HUGE smile on my face!!!! LOVE LOVE LOVE these!!!!!ReplyCancel

  • Jill - These are absolutely beautiful!!!ReplyCancel

share on facebook|follow me on twitter|pin it|email post to a friend

This is a little lesson for all of us trying to balance the capturing of the moment with the antics of capricious children while avoiding turning our cameras back to auto mode.

It was a Tuesday in the summer. I had brought my camera with me to work because I knew that I’d be taking Z to Castle Park at the end of the day. I wanted to work on spot metering and getting my exposure nailed in camera since I had had a few snafus months before.

It had been ages since I had used my nifty-fifty lens (50mm 1.4G), so I had to get re-used to zooming with my feet, as it were. I shot what I could and what Z would allow, but then as we were leaving I saw this cool patterned crosswalk that I thought would look fabulous in a shot.

Now if I had a time-freeze button, I could have pushed it and taken the necessary time to scope out the best positioning and the best shooting angle in relation to the setting sun, other people, and the fact that it was a freaking cross walk that cars were crossing intermittently. But you can imagine that at the end of the day, with a cranky preschooler, I had no time-freeze button with which to avail myself.

It became a quick dance of positioning (No, Z I will not let any cars come near you, I swear!), framing, metering/focusing, and then pressing the shutter. This is what resulted:

Notice something besides the epic cuteness of my kid? Yeah, I screwed the pooch with the leading lines and the photos’ balance. It looks off, cockeyed, if you will.

Finally realizing that in all my quick prep I had failed to consider the overall balance, I moved my position a little and begged Z’s continued patience and captured this:

Ahh, now that’s a lot better for the eyes. Not so jarring. It isn’t perfect, but it’s a heck of a lot better.

So this is a little reminder that you need to scan the scene fully before depressing the shutter, even in those I only have a second before my kid enters meltdown modes we often find ourselves shooting in. Your eyes will thank you!

  • Mason - Jubbies! Love that jubby! (and you too)ReplyCancel

share on facebook|follow me on twitter|pin it|email post to a friend

One of the interesting things for me along my photographic journey has been the way that I’ve grown to love some of the artistic styles I’ve been exposed to during these past few years. Β Yet the beauty of the art, as we know, often lies in the eyes of the beholder. And what happens when your client doesn’t dig your artistic vision? Or worse yet, sees your vision as a technical flaw? That can be an interesting situation.

It wasn’t that long ago that I could show a photo like this to my AdoringHusband:

And have him say, “Why isn’t she centered?”

He doesn’t say that anymore.Β  πŸ˜€

But even today, I can show him an image I love, like this one:

and have him say, “But I can’t see her face!” I then I try to explain that I was going for something different, yadda, yadda. It soon becomes like the old adage you hear about telling jokes: if you have to explain it after you’re done, then it just wasn’t funny. If I need to explain what I was going for in the image, then either I didn’t succeed, or I just didn’t succeed with my husband.

Yet it brings us back to the point about clients. There was a great discussion on a photography board today about how your artsy style might not be liked or appreciated by the client. In the example given, a photographer shot a wedding. In addition to the standard shots, she captured one that was backlit and had sunflare and haze. It was lovely and technically perfect. Yet some acquaintance on her blog commented, “how can you show such an image on your blog?! It’s overexposed!

Now there was a beautiful and stylistically perfect image being thought of as being a bad shot. Ouch!Β  πŸ˜₯

This type of comment/attitude is definitely in my mind as I work to refine my style. I didn’t appreciate sunflare, hazy and backlit shots until I got more proficient in taking them (and it is tricky, indeed) and recognized the ethereal, airy quality they possess. Yet again, I am concerned about a client thinking, why does she have this hazy shot in my gallery?! That should have been one of the rejects!

During this phase, I’ve been offering both the “hazy/backlit” and the “normal” versions of some images.

Haze:

No haze:

Haze:

No haze:

I can recognize and appreciate both versions, though I am starting to lean toward haze and backlight when the light is glorious and yummy like it was in the shoot above. Yet I wouldn’t want those tykes’ parents to look at the hazy shots and say, WTH was she thinking? Doesn’t she know how to take a sharp picture?

I’m getting to become more comfortable with my style, but I know that some people might be left scratching their heads…like my dear husband who looked at my silhouettes and said, “Well isn’t she a bit underexposed in these?”

“Yes, my sweetie, deliberately.”

“Oh,” he began, “I guess I don’t get it.”

You just gotta love him.Β  πŸ˜‰

  • Tara - I’m a little torn. If I’m paying for a professional to take pictures for me I think I lean towards wanting a very clear and bright picture where I can see the details of my kids faces to remember for all eternity. πŸ™‚ But on the other hand….for decorative and artistic purposes I like the hazy type images as well. However, there are many other artistic styles I like over haze. It usually does leave me thinking “what?” And silhouette type photos, I wouldn’t like to get from a photographer I don’t think because I almost feel like I could do that myself. So much to think about Liana….you’re doing a great job! And wow..your website is amazing!!!ReplyCancel

    • Liana - Tara, thanks for sharing your thoughts. I think that at this stage as I’m finding my style, it’s important for me to show both versions of a photo (and in some cases there are 3 versions including the black & white. But eventually when I find my approach, I wonder whether people who like haze or whatever thing I’m into will be the ones who self-select me and others who find my portfolio not a good match for what they like, would not choose me to be their photographer. But this does beg an interesting question. Does one choose a photographer based on the style in his/her portfolio or does one see the photographer as being hired to produce YOUR style, whether or not it is aligned with his/her style? Very interesting questions, indeed.

      And thanks for the compliments on my work and the site. I’m coming along pretty well, I think!ReplyCancel

  • Hilary - I think showing both is best. I recently had a family photoshoot (once again, I wish you lived closer!) and got a couple of pictures in multiple styles (B&W, color, with artistic license). It allows me to decide which ones I want clear pictures to showcase my family and which ones I want to use as “art”. Also, sometimes the artistic photos – like the one of the little girl in the basket above – soften the photo, so its more “pleasing” to look at. I love pictures of kids not looking, since it often truly captures who the child is. I know my son is rarely sitting with a sweet smile on his face, so while I want a few of those to capture the rare moment, I also want the picture of him running across the lawn which captures a period of his life.

    Either way, all of your pictures are incredible.ReplyCancel

    • Liana - Hilary,

      Thanks for your comments. It does seem like my evolving style is aligned with yours. As you look through my portfolio, you’d probably see images that resonated for you. And I think that makes a great match between photog and client. Yet when I start venturing into something different, I have to be careful not to “spring it on a client” since it will deviate from what they’ve seen in my previous work. I’m really trying to be mindful of this as I expand my technique.

      And I’m thrilled you like my work!ReplyCancel

  • Kellie - I like both options. In the pictures you showed above, I loved the hazy look with the boy and girl together. It made the picture feel “softer”. The one with just the little girl, it looked more just fuzzy. Love the silhouette looks and where she’s playing on the pumpkin, looks just so natural and adorable. Shows her adventurous side.ReplyCancel

    • Liana - Hi Kellie,

      Thanks for your thoughts. And yes the tricky thing with haze is that it does wash the photo out. During that shoot I was conflicted between finally getting sunflare and haze successfully but then ending up de-hazing because the photos didn’t have my usual pop. As I went along in my editing I began to get a feel for which ones would work softer, but then again, that doesn’t mean the client won’t go, huh?! So I try to include two versions, though it makes more work of my editing. I’ll sort it out eventually.

      Thanks also for the compliments on the Zizi pics. Silhouettes are indeed tricky, as I discovered, but I thought they were really fun shots. And the pumpkin? I love it!ReplyCancel

  • Hilary - Good points about not springing it on a client. I think as long you provide two options as for the ones where you are deviating from the expected at the start, you’ll be in good shape. I know personally, I am always really excited to see pictures that are unexpected. It makes me all the more impressed.

    In our family shoot, the photographer took a feet shot, had all of us in a row with our fee cut off. My husband was like “huh??? we have no heads” but I think the picture is really great artistic picture. That said, I probably won’t hang it on my wall, but it was neat to see. Also, I always buy the digital images, so its nice to have to look back at someday and remember.ReplyCancel

  • Monica Brushett - Can’t readily define what I do and don’t like. The vast majority of your shots are magical Liana, whether traditional or edgy and that is what I look for and enjoy viewing…magic!ReplyCancel

  • Annie - I adore the hazy, the underexposed, the loveliness of sunflare and the rule of thirds and faceless personality shots, the hands and feet, and walk-aWays.. To me, one hires a “freerange” photographer (i dont know what you really call it) to capture the true essence of something, not to deliver studio portraits. The subject is obviously the focus of the session, but the photog is hired for their style and artistic vision. It benefits your business to offer both, but always let your artsy come through!!ReplyCancel

share on facebook|follow me on twitter|pin it|email post to a friend