
This is what I hope to be the first of a new feature here on the EJP photoblog: a step by step tutorial of how I can take your good shot and make it fabulous with the wonders of Photoshop. (Please note that the steps I’m using here can also be done in Photoshop Elements.)
Our Facebook fan, Sheila Hardie, submitted some great shots of her daughter for me to use for this tutorial. My goal for this tutorial was to use a really good shot that didn’t need a Hail Mary of repair work to save it. Instead I hope to show you how a few tweaks can give your SOOC (straight out of the camera) shot more pizzazz.
Of the ones that Sheila sent, I chose this photo to work with because I loved the composition with the leading lines. I also love the innocent expression on her daughter’s face.
![]()
![]()
![]()
Straight out of the camera (SOOC) this is a nice shot. It is a tad underexposed, but overall it is great for our purposes here.
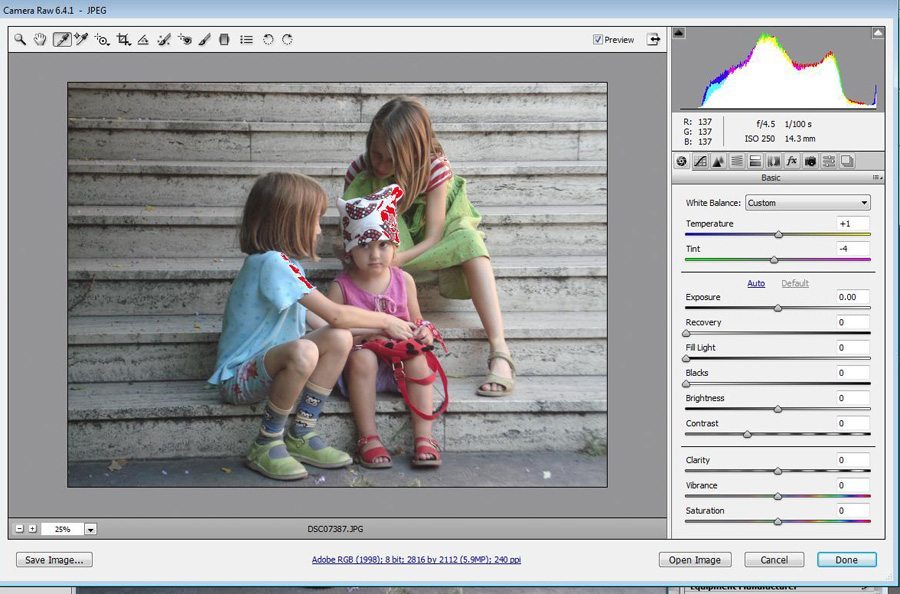
The first thing I did was to bring it into Camera Raw. This is the interface with Photoshop that allows you to make some basic tweaks.
![]()

![]()
For now let’s ignore the red blinkies in the hat for the moment. The first thing we want to do here is to correct the photo’s white balance. Since light has different temperatures, if your camera’s automatic settings for capturing the light temperature are off, the white balance will be off. Things that are supposed to look white aren’t and colors tend to be less like what you saw with your eyes.
In this next screenshot, I’ve used the white balance tool (circled) to pick a point in the photo that is most neutral/near a 12% gray. Clicking here changed the temperature of the light. You can see the subtle but real difference after this change.
![]()
The color was changed just a fraction. I was tempted to use the white part of the hat as a place to measure but the result was way too yellow. And I thought the stairs might be good, but I see now that they aren’t gray marble. The tone is yellowish, so that would have thrown things off as well.
I then raised the exposure a half stop to brighten the underexposure.
![]()
![]()
![]()
This moved our histogram to the right a bit (you can see the histogram in the top right part of the screenshot) and the circled area got clipped (meaning the pixels are brighter than what can be registered by the camera). We want to avoid clipping if possible, but in this case we needed to brighten the photo. To correct the clipping, we will use the recovery slider. This slider helps bring the clipped highlights (red in the photo) back into a normal range.
![]()
![]()
![]()
The red blinkies are gone and our histogram looks a little better.
Now it is time to open the image in Photoshop.
![]()
![]()
![]()
When I open a photo into Photoshop, especially with an underexposed photo such as this, I always zoom to 100% so that I can see what the picture looks like up close and personal. Here we can see that as is common with underexposure, there is a lot of grain/noise to the photo. It can look great when looked at from a distance, but up close or with more enlargement, we see this noise that results from our brightening.
So what do we do about it? Well my preference is to use a noise reduction program. I use Noiseware, one of the best there are out there. Here’s a screenshot of Noiseware’s before and after processing of this photo:
![]()
![]()
![]()
It can’t make it perfect, but it helps it an awful lot, right?
Now we still see the photo is underexposed a bit. So we’re going to do a little trick to brighten it. The first thing I do is to make a copy of the background layer. I’ll change the name of this copy to “lightening layer.” And this is where we will use some of the blending modes that you see in the layers panel in the lower right of the screenshot. I’m choosing the one called “Screen.” Screen blend mode helps lighten shadows. At 100% it was too much, but I lowered it to 50% and this is the result:
![]()
![]()
![]()
The exposure looks much better, but the photo lacks oomph…otherwise known as contrast. So I add this by using a levels adjustment layer:
![]()
![]()
![]()
I moved the left slider in the histogram at the right toward where the pixels actually start. (The slider was all the way at the left on 0 and I moved it to about 45. See the arrow.) This helped balance the photo and gave it more contrast.
The last thing I did was all about more presence. I used a funky filter called the high pass filter:
![]()
![]()
![]()
When you go to use this filter, it will look a little scary, like this:
![]()
![]()
![]()
The goal is to adjust the radius enough to give the image a little more 3D quality. Now the best guidance I was given for selecting one’s radius is to start at 0 and increase the radius until you start to see colors come through in the photo. I’ve never asked why that point is the best, but I’ve continued to use that guidance. And in the screenshot above, you can just start to see the orange dots in the hat starting to show their color. I stopped there.
![]()
![]()
![]()
When you use this filter, you have to select a blend mode for blending it to the layer below. I went back and forth between overlay and soft light…both of these blend modes lighten your lights and darken your darks thus giving the photo more presence, yet soft light is more subtle than overlay. I went with soft light.
So with these few tweaks, we went from this:
![]()
![]()
![]()
To this:
![]()
![]()
![]()
I like it. The change isn’t drastic. It’s just got a bit more oomph. What do you think, Sheila?
I hope you enjoyed this tutorial. If anything was too technical or you need more information about any of the steps, please don’t hesitate to ask in the comments.
Thanks for reading Pimp My Pic #1! 😀

Sheila - Wow, it certainly makes a big difference! Fantastic! Thanks for the detailed explanation, Liana. One day, when I have more time (and money), I’m going to invest in a better camera (the one used to take the above photo is not too good, plus it is now broken!) and try to learn to use Photoshop. It seems very complicated, but certainly worth the effort. Thanks again, Liana 🙂
Liana - Sheila: I’m glad you like and appreciate the edit! But don’t make me go back to my old truism: the camera is just the tool. You may not need a better one but you do need a working one! This photo is lovely SOOC. It is just a little underexposed.
And Photoshop can be daunting at first. It scared the bejesus out of me when I first started, but when you understand the approach to editing (as outlined here) you can begin to get how to order the steps you do in processing.
Photoshop Elements is a much less expensive program but does much of the same things I’ve outlined here. So that is an alternative to PS. And even programs like Picasa now allow you to do some white balance and exposure tweaks!
I’ll send you the edited copy of the photo for you to have. Thanks again for this submission.
Joanna - Hi Liana! This is really, really fab. You know I work with photos each and every day and *I’M* just very impressed. Well organized workflow, fantastic results! Can’t wait to send a photo in and see your magic. I really don’t know how you do it all, but I’m glad you do and share it with us! 🙂
-Joanna